When facing water damage, it’s vital to act quickly and methodically. Starting with a thorough assessment can set the tone for effective water cleanup. From safety precautions to equipment gathering, each step plays a pivotal role in minimizing damage. Understanding these essential techniques can help you navigate the complexities of emergency water cleanup with confidence.
Key Takeaways
- Quickly assess the affected areas for damage and identify the water source to stop further flow.
- Utilize powerful water extraction pumps and wet/dry vacuums for effective water removal.
- Employ fans and dehumidifiers to enhance drying and reduce moisture levels in the area.
- Wear protective gear, including gloves and masks, to safeguard against contaminants and mold exposure.
- Document the damage thoroughly with photos and lists to support future claims and repairs.
Assessing the Extent of Water Damage
When you encounter water damage, it’s essential to assess the situation quickly to prevent further complications.
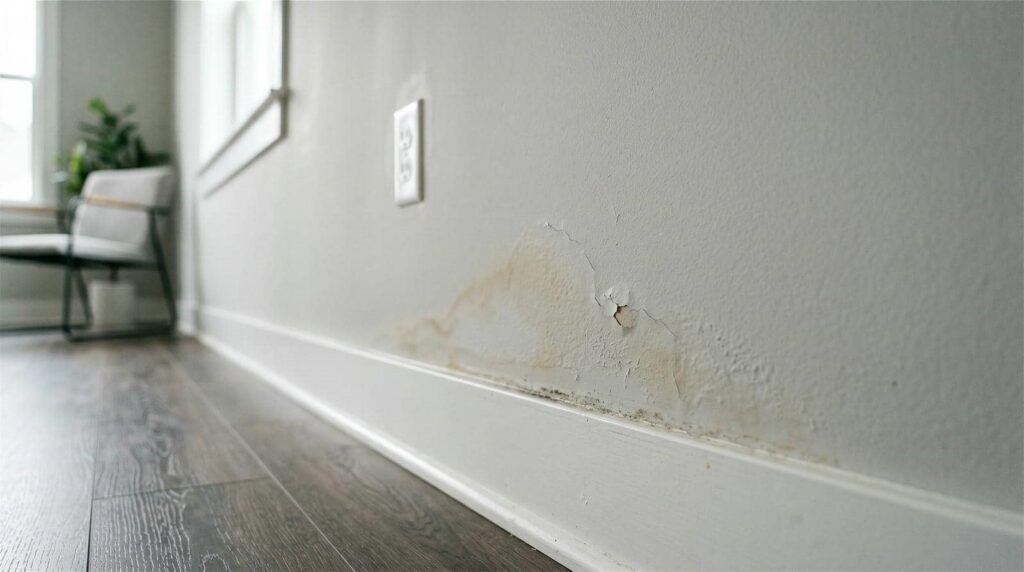
Start with an initial damage assessment by documenting affected areas. Look for visible signs of damage, such as discoloration on walls and ceilings, warped flooring, or mold growth. These indications will help you understand the extent of the damage.
Next, prioritize water source identification. Determine whether the water comes from a broken pipe, roof leak, or flooding. Identifying the source is vital for effective remediation, as it allows you to stop the flow and mitigate additional damage.
Check for leaks in plumbing fixtures and examine the roof for any vulnerabilities.
Safety Precautions Before Cleanup
Before you begin cleanup, it’s essential to equip yourself with the appropriate personal protective equipment, such as gloves and masks, to minimize exposure to contaminants.
Be aware of potential electrical hazards, especially if water has come into contact with wiring or outlets.
Additionally, recognize the risks associated with contaminated water, which may pose serious health threats if not handled properly.
Personal Protective Equipment
Personal protective equipment (PPE) is essential for ensuring your safety during emergency water cleanup.
Start with proper gloves selection; choose nitrile or latex gloves to protect your hands from contaminants. Make sure they fit snugly to avoid any exposure.
Next, consider mask types; a N95 respirator is ideal for filtering out airborne particles, but if you’re dealing with chemical exposure, opt for a full-face respirator with appropriate filters.
Don’t forget eye protection—safety goggles will shield your eyes from splashes. Additionally, wear waterproof boots to keep your feet dry and safe.
By using the right PPE, you protect yourself and enhance the efficiency of your cleanup efforts.
Make safety your priority to foster a sense of belonging in your community.
Electrical Hazard Awareness
Understanding electrical hazards is essential for anyone involved in emergency water cleanup. Before starting, you must prioritize electrical safety by identifying potential hazards.
Inspect the area for any downed power lines, exposed wires, or damaged electrical equipment. Always assume that wet areas are energized until proven otherwise. If you suspect electrical risks, turn off the power at the circuit breaker before entering the flooded zone.
Use a multimeter to verify that circuits are de-energized. Keep your personal protective equipment dry, and avoid contact with wet surfaces when handling electrical devices.
Contaminated Water Risks
When dealing with contaminated water, it’s vital to recognize the potential health risks that can arise from exposure to hazardous substances. Contaminated sources can introduce pathogens, chemicals, and heavy metals, leading to severe health implications.
Before starting cleanup, always assess the area for visible contaminants and consider using protective gear such as gloves, masks, and boots to shield yourself from harmful agents. Ensure proper ventilation in the workspace to minimize inhalation risks.
It’s important to avoid direct contact with the water and to wash your hands thoroughly after any potential exposure. Keep children and pets away from contaminated areas to prevent accidental exposure.
Gathering Necessary Equipment
Gathering the right equipment is essential for effective emergency water cleanup. Start by obtaining a powerful water extraction pump, which will help you remove standing water quickly and efficiently.
You’ll also need wet/dry vacuums, as they can manage smaller amounts of water and debris. Don’t forget to include moisture meters; these devices are important for detecting hidden moisture in walls and floors, ensuring you address all potential issues.
Next, stock up on absorbent materials like towels and mops for any residual moisture. Protective gear, including gloves and masks, is crucial to safeguard yourself from contaminants.
Additionally, fans and dehumidifiers will aid in drying out the area and preventing mold growth. By assembling this equipment in advance, you’ll be ready to tackle any water emergency with confidence, knowing you’re part of a community that values safety and preparedness.
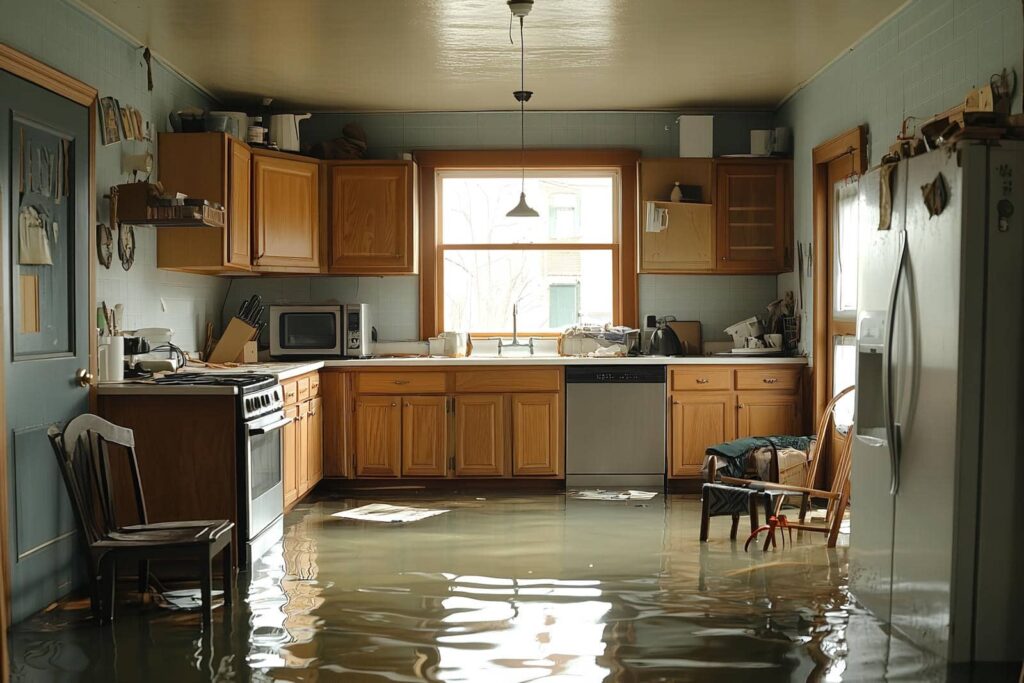
Removing Standing Water
To effectively remove standing water, you’ll need to select the right equipment, such as a submersible pump or wet/dry vacuum.
Before you start, prioritize safety by wearing appropriate gear, including gloves and rubber boots, to protect yourself from potential hazards.
Once you’re prepared, you can begin the removal process systematically and efficiently.
Use Appropriate Equipment
Effective removal of standing water requires the right equipment to ensure a swift and thorough cleanup. Start with a high-capacity pump for efficient water extraction, making sure you tackle the situation promptly.
Utilize wet/dry vacuums to remove residual water, especially in hard-to-reach areas. Once you’ve extracted the bulk of the water, employ industrial fans and dehumidifiers as part of your drying techniques. These tools help prevent mold growth and further damage, creating a healthier environment.
Make certain you’re familiar with each piece of equipment; this knowledge fosters confidence as you work. Remember, using the appropriate tools streamlines the process and enhances your ability to restore your space effectively, bringing you and your community back together after an emergency.
Safety Precautions First
Before you begin removing standing water, it’s essential to prioritize safety to prevent accidents or injuries.
Start by wearing appropriate personal protective equipment (PPE), including gloves and waterproof boots, to ensure water safety. Disconnect any electrical appliances in the vicinity to avoid electrocution risks. If the water is floodwater, test for contaminants before proceeding.
Always work with a buddy, as emergency preparedness includes having someone nearby in case of unforeseen complications. Use a wet/dry vacuum for effective removal, and make certain your workspace is well-ventilated.
Keep a first aid kit handy and be aware of your surroundings throughout the process. By following these safety precautions, you can confidently tackle the task while protecting yourself and others.
Drying Out Affected Areas
Begin by evaluating the moisture levels in affected areas, as timely action is essential for preventing further damage and mold growth. Use a moisture meter to assess the extent of the saturation.
Once you’ve identified the most affected spots, implement effective moisture removal techniques. Start by removing any standing water with a wet vacuum or pump.
Next, employ ventilation techniques to enhance air circulation. Open windows and doors to create cross-ventilation, or use fans strategically to direct airflow towards damp areas.
Dehumidifiers can also be beneficial; they pull moisture from the air, accelerating the drying process.
Keep an eye on humidity levels, aiming for below 60% to inhibit mold growth. Regularly check the status of the affected areas, ensuring all materials, including carpets and drywall, dry thoroughly.
This step is vital for maintaining a safe and healthy environment.
Cleaning and Disinfecting Surfaces
Once the affected areas are thoroughly dried, it’s time to focus on cleaning and disinfecting surfaces to eliminate any remaining contaminants and prevent health risks.
Start with surface cleaning using a mixture of warm water and mild detergent to remove dirt and debris. Scrub surfaces with a cloth or sponge, making certain you pay special attention to high-touch areas.
Next, select the appropriate disinfectant types. EPA-registered disinfectants are most effective; read labels for specific contact times. For non-porous surfaces, use sprays or wipes, while porous materials may require steam cleaning or specialized solutions.
Always wear protective gear, such as gloves and masks, to safeguard yourself during this process.
After applying the disinfectant, let it sit for the recommended time before wiping it off. This methodical approach ensures a clean environment and fosters a sense of community commitment to health and safety.
Addressing Mold Growth
While cleaning and disinfecting surfaces is crucial, addressing mold growth is equally important to ensure a safe environment after water damage.
Start by thoroughly inspecting affected areas and identifying any visible mold. For effective mold removal, use a solution of water mixed with detergent or a commercial mold remover. Make sure you wear protective gear, such as gloves and a mask, to prevent exposure to spores.
After removing mold, dry the area completely to inhibit future growth. Implement prevention strategies, such as maintaining low humidity levels and improving ventilation.
Regularly check for leaks and repair any water damage promptly. Consider using a dehumidifier in damp areas to further reduce moisture.
By taking these steps, you create a healthier space and foster a sense of community safety.
Inspecting for Structural Damage
When inspecting for structural damage, start by evaluating wall integrity for signs of warping or cracks.
Next, check for mold growth in hidden areas, as water exposure can lead to rapid development.
Finally, assess floor stability to ensure it can safely support weight and prevent further issues.
Assessing Wall Integrity
As you begin evaluating wall integrity after a water emergency, it’s crucial to methodically inspect for any signs of structural damage.
Start by conducting a thorough structural evaluation to assess wall moisture levels and identify potential risks.
Pay close attention to:
- Cracks or bulges in the wall surface
- Soft or spongy areas indicating compromised materials
- Warping or discoloration that signals deeper issues
Documenting these findings will help you prioritize repairs and ensure safety.
Remember, addressing wall integrity isn’t just about aesthetics; it’s about maintaining the overall stability of your home.
Engaging with professionals when necessary fosters a sense of community and reassurance as you navigate this critical process.
Your diligence can prevent further complications down the line.
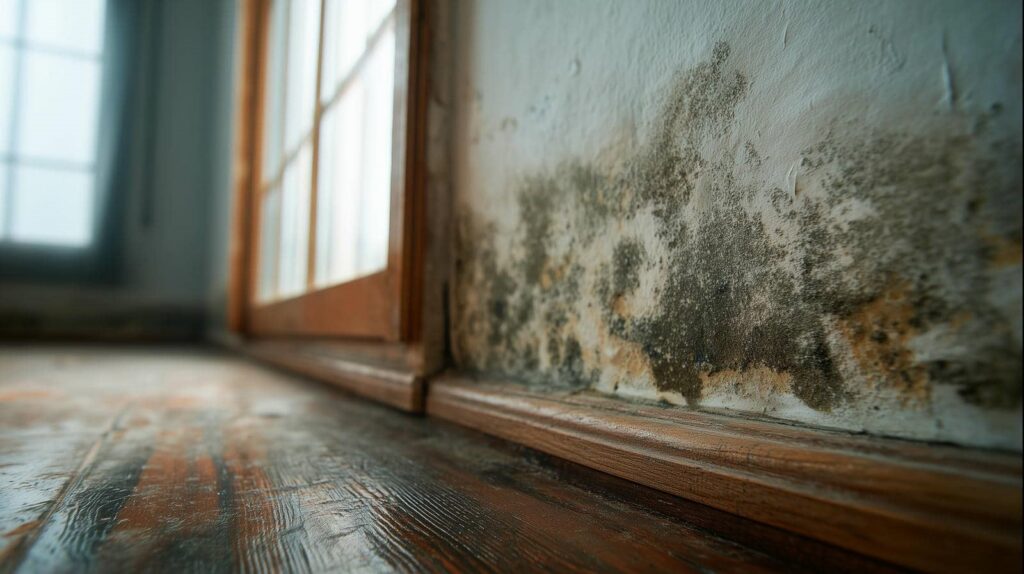
Checking for Mold Growth
One of the critical steps in evaluating damage after a water emergency is checking for mold growth, which can begin within 24 to 48 hours in damp environments.
Start by using mold identification techniques, such as visual inspections for discoloration and musty odors, to locate affected areas.
Pay attention to hidden spaces like behind walls or under carpets, as mold thrives in dark, moist conditions.
If you find mold, it’s essential to implement effective mold removal strategies promptly. This may involve using appropriate cleaning solutions, sealing off contaminated areas, and ensuring proper ventilation during cleanup.
Evaluating Floor Stability
Evaluating floor stability is essential after a water emergency, as structural damage can compromise safety and lead to further complications.
You’ll need to perform a thorough floor strength assessment and stability inspection. Here are key steps to examine:
Check for visible cracks: Look for any fissures in the floor that could indicate structural weaknesses.
Assess moisture damage: Identify areas where water has pooled, as prolonged exposure may weaken the materials.
Test floor integrity: Walk on different sections to feel for soft spots or sagging, which could signal severe damage.
Documenting the Damage for Insurance
When a water emergency strikes, promptly documenting the damage is essential for a successful insurance claim. Start with a thorough damage assessment, identifying all affected areas and items.
Use photo documentation to capture the extent of the damage. Take clear, well-lit pictures from multiple angles, ensuring each affected item is visible. Include close-ups of significant damage, like warped floors or stained walls, as these details can strengthen your claim.
Next, create a detailed list of damaged items, noting their condition and estimated replacement costs. Keep receipts and invoices for any repairs or replacements, as these will support your claim further.
Lastly, consider recording a video walkthrough of the affected areas, providing an all-encompassing view of the situation. This meticulous documentation can help you communicate effectively with your insurance adjuster and expedite the claims process, ensuring you receive the assistance you need.
Preventing Future Water Damage
After documenting the damage for your insurance claim, taking steps to prevent future water damage becomes a priority.
Implementing effective waterproofing techniques and drainage solutions can save you from future headaches.
Focus on these critical areas:
Seal Cracks: Apply waterproof sealants to any cracks in your foundation or walls to prevent water seepage.
Gutter Maintenance: Regularly clean and repair gutters to ensure proper drainage and minimize overflow that can lead to leaks.
Install Sump Pumps: Consider installing sump pumps in vulnerable areas to divert excess water away from your home.
Frequently Asked Questions
How Can I Determine if My Water Damage Is Covered by Insurance?
To determine if your water damage is covered, review your insurance policy for specific exclusions. Then, contact your insurer to initiate the claim process and discuss the extent of your coverage regarding water damage.
What Are the Signs of Hidden Water Damage in My Home?
You’ll notice peeling paint, warped floors, or musty odors—those are signs of hidden leaks. Check behind walls and under sinks; if mold growth appears, it’s essential to address the issue before it worsens.
Can I Use Regular Household Fans for Drying Out Water Damage?
Yes, you can use regular household fans, but their effectiveness may be limited. For best drying techniques, consider high-velocity fans or dehumidifiers to enhance air circulation and expedite moisture removal from affected areas.
Is It Safe to Use Electrical Appliances After Water Exposure?
Using electrical appliances after water exposure isn’t safe; it risks electrical hazards. Always prioritize water safety—disconnect power sources first, then assess the damage. Your well-being is paramount; don’t take unnecessary chances with potential dangers.
How Long Does the Water Damage Restoration Process Typically Take?
The restoration timeline for water damage typically spans several days to weeks. It involves drying phases, including initial extraction, dehumidification, and final restoration. Each phase requires careful monitoring to ensure thorough and effective recovery.
Final Thoughts
Effective emergency water cleanup is vital to minimize damage and restore safety. By following these essential techniques, you can tackle water issues methodically and efficiently. Have you considered how quickly responding to water damage can prevent more extensive problems down the line? Remember, thorough inspections and proactive measures address immediate concerns and safeguard your property against future risks. Stay prepared, act decisively, and ensure your environment remains safe and dry.